2022의 게시물 표시

React Native Error: Reanimated 2 failed to create a worklet, maybe you forgot to add Reanimated's babel plugin?

 리액트 네이티브 드로어 내비게이터를 사용중 아래와 같은 에러가 발생했습니다. 드로어 내비게이터가 의존적인 react-native-reanimated  관련 발생한 에러네요. Error: Reanimated 2 failed to create a worklet, maybe you forgot to add Reanimated's babel plugin? Invariant Violation: Module AppRegistry is not a registered callable module (calling runApplication). A frequent cause of the error is that the application entry file path is incorrect. This can also happen when the JS bundle is corrupt or there is an early initialization error when loading React Native. babel.config.js 파일이 처음에 아래와 같이 되어 있는데 plugins 부분을 추가 해줍니다. module . exports = { presets : [ 'module:metro-react-native-babel-preset' ], }; 아래와 같이 추가 후 npm start -- --reset-cache 를 실행해 번들링을 다시 해주면 잘 되네요. 혹시 plugins 부분이 아래와 같이 단순하지 않으신 분들은 위 링크를 참고해서 배열의 제일 마지막 부분에 내용을 추가해주면 됩니다. module . exports = { presets : [ 'module:metro-react-native-babel-preset' ], plugins : [ 'react-native-reanimated/plugin' ], };

pod install 후 xcrun: error: SDK "iphoneos" cannot be located

이미지
리액트 네이티브 프로젝트를 iOS 시뮬레이터에서 실행하기전에 pod install를 했더니 아래와 같이 에러가 발생하네요. [!] /bin/bash -c  set -e #!/bin/bash # Copyright (c) Meta Platforms, Inc. and affiliates. # # This source code is licensed under the MIT license found in the # LICENSE file in the root directory of this source tree. set -e PLATFORM_NAME="${PLATFORM_NAME:-iphoneos}" CURRENT_ARCH="${CURRENT_ARCH}" if [ -z "$CURRENT_ARCH" ] || [ "$CURRENT_ARCH" == "undefined_arch" ]; then     # Xcode 10 beta sets CURRENT_ARCH to "undefined_arch", this leads to incorrect linker arg.     # it's better to rely on platform name as fallback because architecture differs between simulator and device     if [[ "$PLATFORM_NAME" == *"simulator"* ]]; then         CURRENT_ARCH="x86_64"     else         CURRENT_ARCH="arm64"     fi fi if [ "$CURRENT_ARCH" == "arm64" ]; then     cat <<\EOF >>fix_glog_0.3.5_apple_silico

iOS 시뮬레이터에서 키보드가 안 보이는 경우

이미지
 리액트 네이티브로 TextInput 테스트 중에 iOS 시뮬레이터에서 키보드가 나타나지 않아서 확인해봤습니다. 굳이 리액트 네이티브에서만 발생하는 증상은 아닌 듯 하네요. 시뮬레이터에서 단축키로 command + k 로 바로 토글을 할 수 있습니다. 단축키로 계속적인 토글이 귀찮다면 시뮬레이터 I/O 메뉴 - Keyboard - Connect Hardware Keyboard 체크 해제해주면 키보드 팝업이 잘 되네요.

React Native ERROR Invariant Violation: "myproject2" has not been registered. This can happen if:

 맥에서 리액트 네이티브 iOS 시뮬레이터 실행 중 에러가 발생했네요. ERROR Invariant Violation: "myproject2" has not been registered. This can happen if: * Metro (the local dev server) is run from the wrong folder. Check if Metro is running, stop it and restart it in the current project. * A module failed to load due to an error and `AppRegistry.registerComponent` wasn't called Metro에서 발생한 에러인데, 에러메세지 바로 밑에 설명처럼 잘못된 폴더에서 Metro가 실행되고 있어서 발생한 에러네요. myproject에서 실행하다 만 Metro가 있길래 그냥 진행했더니 프로젝트 폴더별로 Metro가 의존적인가 봅니다. Metro를 종료하고 다시 프로젝트 실행하면 되네요.

Mac error Error: Failed to install CocoaPods dependencies for iOS project, which is required by this template.

 맥에서 리액트 네이티브 프로젝트 생성중에 CocoaPods관련 에러가 발생하네요. Welcome to React Native!                  Learn once, write anywhere ✔ Downloading template ✔ Copying template ✔ Processing template ✖ Installing CocoaPods dependencies (this may take a few minutes) ✖ Installing CocoaPods dependencies (this may take a few minutes) error Error: Failed to install CocoaPods dependencies for iOS project, which is required by this template. Please try again manually: "cd ./project/ios && pod install". CocoaPods documentation: https://cocoapods.org/ 기존 포스팅에서 brew install --cask cocoapods 로 설치 했었는데 uninstall 시킨 후 아래와 같이 설치한 cocoapods를 사용하면 이슈가 해결되네요. 제 맥이 구버전이라 그런건지 카탈리나라 그런건지.. brew install cocoapods Warning: Treating cocoapods as a formula. For the cask, use homebrew/cask/cocoapods ==> Downloading https://ghcr.io/v2/homebrew/core/cocoapods/manifests/1.11.3 Already downloaded: /Users/wwforever/Library/Caches/Homebrew/downloads/e1e42eaf7a9c48aaa7a74e8eca36666f4b6f6d2aff14c2505bcb6e1d84cfbea5-

Mac Error installing cocoapods: ERROR: Failed to build gem native extension.

 리액트 네이티브 프로젝트는 맥에서 설정 중 cocoapods 설치 관련 에러가 발생했네요. 참고로 맥북프로 2015년형이라 MacOS 카탈리나에 Xcode는 12.4입니다. sudo gem install cocoapods Password: Building native extensions. This could take a while... ERROR:  Error installing cocoapods: ERROR: Failed to build gem native extension.     current directory: /Library/Ruby/Gems/2.6.0/gems/ffi-1.15.5/ext/ffi_c /System/Library/Frameworks/Ruby.framework/Versions/2.6/usr/bin/ruby -I /System/Library/Frameworks/Ruby.framework/Versions/2.6/usr/lib/ruby/2.6.0 -r ./siteconf20220422-38063-jofjbd.rb extconf.rb checking for ffi.h... *** extconf.rb failed *** Could not create Makefile due to some reason, probably lack of necessary libraries and/or headers.  Check the mkmf.log file for more details.  You may need configuration options. Provided configuration options: --with-opt-dir --without-opt-dir --with-opt-include --without-opt-include=${opt-dir}/include --with-opt-lib --without-opt-lib=${opt-dir}/lib --with-make-prog --without-make-prog --sr

NodeJS gyp ERR! find VS msvs_version not set from command line or npm config

 윈도우 환경에서 클레이튼 개발 튜토리얼 중에 CountBApp 개발하기를 따라하던 중 단순히 npm install을 실행한 상황에서 에러가 발생했습니다. D:\Study\countbapp\node_modules\keccak>if not defined npm_config_node_gyp (node "C:\Users\wwfor\AppData\Roaming\nvm\v14.19.0\node_modules\npm\node_modules\npm-lifecycle\node-gyp-bin\\..\..\node_modules\node-gyp\bin\node-gyp.js" rebuild )  else (node "C:\Users\wwfor\AppData\Roaming\nvm\v14.19.0\node_modules\npm\node_modules\node-gyp\bin\node-gyp.js" rebuild ) gyp ERR! find VS  gyp ERR! find VS msvs_version not set from command line or npm config gyp ERR! find VS VCINSTALLDIR not set, not running in VS Command Prompt gyp ERR! find VS could not use PowerShell to find Visual Studio 2017 or newer gyp ERR! find VS looking for Visual Studio 2015 gyp ERR! find VS - not found gyp ERR! find VS not looking for VS2013 as it is only supported up to Node.js 8 gyp ERR! find VS gyp ERR! find VS ************************************************************** gyp ERR! find VS You need to install

React Native Could not find method compile() for arguments [com.facebook.react:react-native:+] on object of type org.gradle.api.internal.artifacts.dsl.dependencies.DefaultDependencyHandler.

 빌드 및 실행이 잘되던 리액트 네이티브 프로젝트가 SSD 고장으로 다시 윈도우 재 설치 후 개발 환경이 뭔가 바뀌었는지 아래와 같이 에러가 발생하네요. * Where: Build file 'D:\Study\rnstudy\node_modules\react-native-os\android\build.gradle' line: 43 * What went wrong: A problem occurred evaluating project ':react-native-os'. > Could not find method compile() for arguments [com.facebook.react:react-native:+] on object of type org.gradle.api.internal.artifacts.dsl.dependencies.DefaultDependencyHandler. 해당 파일에 가서 아래와 같이 compile부분을 implementation으로 변경해줍니다. dependencies { compile 'com.facebook.react:react-native:+' } 문제는 하나 고치고 빌드하면 아래와 같이 또 발생하네요. 나오는 것 모두 수정해줍니다. * Where: Build file 'D:\Study\rnstudy\node_modules\react-native-tcp\android\build.gradle' line: 43 * What went wrong: A problem occurred evaluating project ':react-native-tcp'. > Could not find method compile() for arguments [com.facebook.react:react-native:+] on object of type org.gradle.api.internal.artifacts.dsl.dependencies.DefaultDependency

React Native TypeError: null is not an object (evaluating 'RNRandomBytes.seed')

 멀고도 험한 리액트 네이티브 초보의 길이네요.  @medardm/react-native-bip39 로 니모닉 생성 테스트중 아래와 같이 에러가 발생했습니다. ERROR  TypeError: null is not an object (evaluating 'RNRandomBytes.seed') ERROR  TypeError: undefined is not an object (evaluating '_$$_REQUIRE(_dependencyMap[3], "react-native-randombytes").randomBytes') 다른 react-native-bip39 때문에 설치 되었던 react-native-randombytes 를 다시 설치해주면 해결 됩니다.

React Native ERROR TypeError: undefined is not an object (evaluating '_reactNativeBip.default.generateMnemonic')

 리액트 네이티브 bip39 패키지를  @medardm/react-native-bip39 로 변경 후 에러 발생입니다. ERROR TypeError: undefined is not an object (evaluating '_reactNativeBip.default.generateMnemonic') import bip39 from '@medardm/react-native-bip39' ; 위와 같이 임포트 해줬었는데, 아래와 같이 중괄호로 generateMnemonic을 꺼내오던가 as로 임포트 해줍니다. import { generateMnemonic } from '@medardm/react-native-bip39' ; import * as bip39 from '@medardm/react-native-bip39' ;

React Native error: package com.bitgo.randombytes does not exist

 리액트 네이티브 bip39관련 패키지 에러로 다른 패키지를 설치하려고 아래의 두 패키지를 제거했더니 에러가 발생하네요. react-native-bip39 react-native-randombytes error Failed to install the app. Make sure you have the Android development environment set up: https://reactnative.dev/docs/environment-setup. Error: Command failed: gradlew.bat app:installDebug -PreactNativeDevServerPort=8081 D:\Study\rnstudy\android\app\src\main\java\com\rnstudy\MainApplication.java:7: error: package com.bitgo.randombytes does not exist import com.bitgo.randombytes.RandomBytesPackage; 로그에 나와있는데로 MainApplication.java에 가서 필요없어진 import를 제거해줍니다.

React Native Error: Unable to resolve module assert from \react-native-bip39\index.js: assert could not be found within the project or in these directories

 리액트 네이티브 가는길이 험난하군요. 마치 예전 cocos2d-x 프로젝트 진행할 때 이슈들을 보는 느낌적인 느낌입니다. 이번에는 react-native-bip39 모듈이 말썽이네요. Error: Unable to resolve module assert from D:\Study\rnstudy\node_modules\react-native-bip39\index.js: assert could not be found within the project or in these directories: node_modules\react-native-bip39\node_modules node_modules 1 | var unorm = require('unorm') > 2 | var assert = require('assert') | ^ 3 | var pbkdf2 = require('react-native-crypto').pbkdf2Sync 4 | var createHash = require('react-native-crypto').createHash 5 | var randomBytes = require('react-native-randombytes').randomBytes at ModuleResolver.resolveDependency (D:\Study\rnstudy\node_modules\metro\src\node-haste\DependencyGraph\ModuleResolution.js:158:15) at DependencyGraph.resolveDependency (D:\Study\rnstudy\node_modules\metro\src\node-haste\DependencyGraph.js:231:43) at Object.resolve (D:\Study\rnstudy\node_modules\metro\src

React Native Error: Unable to resolve module process from shim.js process could not be found within the project or in these directories

  리액트 네이티브에서 node.js 코어 모듈과 npm 모듈을 사용할 수 있게 해주는 rn-nodeify 를 설치 중에 에러가 발생했네요. error: Error: Unable to resolve module process from D:\Study\rnstudy\shim.js: process could not be found within the project or in these directories: node_modules 1 | if (typeof __dirname === 'undefined') global.__dirname = '/' 2 | if (typeof __filename === 'undefined') global.__filename = '' > 3 | if (typeof process === 'undefined') { | ^ 4 | global.process = require('process') 5 | } else { 6 | const bProcess = require('process') at ModuleResolver.resolveDependency (D:\Study\rnstudy\node_modules\metro\src\node-haste\DependencyGraph\ModuleResolution.js:158:15) at DependencyGraph.resolveDependency (D:\Study\rnstudy\node_modules\metro\src\node-haste\DependencyGraph.js:231:43) at Object.resolve (D:\Study\rnstudy\node_modules\metro\src\lib\transformHelpers.js:129:24) at resolve (D:\Study\rnstudy\node_modules\metro\src\DeltaBundler\traverseDepen

React Native ERROR Invariant Violation: requireNativeComponent: "RNCSafeAreaProvider" was not found in the UIManager.

 리액트 네이티브 초기 세팅 관련 마지막 에러가 되지 싶네요. ERROR  Invariant Violation: requireNativeComponent: "RNCSafeAreaProvider" was not found in the UIManager. This error is located at:     in RNCSafeAreaProvider (at SafeAreaContext.tsx:87)     in SafeAreaProvider (at SafeAreaProviderCompat.tsx:46)     in SafeAreaProviderCompat (at StackView.tsx:430)     in RNGestureHandlerRootView (at GestureHandlerRootView.android.tsx:23)     in GestureHandlerRootView (at StackView.tsx:429)     in StackView (at createStackNavigator.tsx:121)     in Unknown (at createStackNavigator.tsx:120)     in StackNavigator (at App.tsx:22)     in EnsureSingleNavigator (at BaseNavigationContainer.tsx:430)     in BaseNavigationContainer (at NavigationContainer.tsx:132)     in ThemeProvider (at NavigationContainer.tsx:131)     in NavigationContainerInner (at App.tsx:21)     in App (at renderApplication.js:50)     in RCTView (at View.js:32)     in View (at AppContainer.js:92)     in RCTView (at View.js:32)     in View (at AppC

React Native react-native-gesture-handler module was not found.

 리액트 네이티브 네비게이션의 의존성 끝은 어디건지... 계속 에러입니다. ERROR  [react-native-gesture-handler] react-native-gesture-handler module was not found. Make sure you're running your app on the native platform and your code is linked properly (cd ios && pod install && cd ..). For installation instructions, please refer to https://docs.swmansion.com/react-native-gesture-handler/docs/#installation npm install react-native-gesture-handler 설치해주고 다시 빌드해줍니다.

React Native ERROR Invariant Violation: requireNativeComponent: "RNSScreen" was not found in the UIManager.

 리액트 네이티브 네비게이션은 의존 패키지가 있나보네요.  ERROR  Invariant Violation: requireNativeComponent: "RNSScreen" was not found in the UIManager. This error is located at:     in RNSScreen (at createAnimatedComponent.js:211)     in AnimatedComponent (at createAnimatedComponent.js:264)     in AnimatedComponentWrapper (at src/index.native.tsx:281)     in MaybeFreeze (at src/index.native.tsx:280)     in Screen (at Screens.tsx:37)     in MaybeScreen (at CardStack.tsx:654)     in RNSScreenContainer (at src/index.native.tsx:351)     in ScreenContainer (at Screens.tsx:20)     in MaybeScreenContainer (at CardStack.tsx:566)     in RCTView (at View.js:32)     in View (at Background.tsx:13)     in Background (at CardStack.tsx:564)     in CardStack (at StackView.tsx:437)     in RNCSafeAreaProvider (at SafeAreaContext.tsx:87)     in SafeAreaProvider (at SafeAreaProviderCompat.tsx:46)     in SafeAreaProviderCompat (at StackView.tsx:430)     in RNGestureHandlerRootView (at GestureHandlerRootView.android.tsx

React Native Error: While trying to resolve module `@react-navigation/stack` from file

 리액트 네이티브에 리액트 네비게이션 연동 중 에러가 발생했습니다. error: Error: While trying to resolve module `@react-navigation/stack` from file `D:\Study\rnstudy\App.tsx`, the package `D:\Study\rnstudy\node_modules\@react-navigation\stack\package.json` was successfully found. However, this package itself specifies a `main` module field that could not be resolved (`D:\Study\rnstudy\node_modules\@react-navigation\stack\src\index.tsx`. Indeed, none of these files exist:   * D:\Study\rnstudy\node_modules\@react-navigation\stack\src\index.tsx(.native|.android.js|.native.js|.js|.android.json|.native.json|.json|.android.ts|.native.ts|.ts|.android.tsx|.native.tsx|.tsx)   * D:\Study\rnstudy\node_modules\@react-navigation\stack\src\index.tsx\index(.native|.android.js|.native.js|.js|.android.json|.native.json|.json|.android.ts|.native.ts|.ts|.android.tsx|.native.tsx|.tsx)     at DependencyGraph.resolveDependency (D:\Study\rnstudy\node_modules\metro\src\node-haste\DependencyGraph.js:243:17)     at Object.resolve (D:\Study

Raact Native Template Typescript 특정 버전 설치하기

이미지
 윈도우 환경에서 리액트 네이티브 타입스크립트 템플릿의 특정 버전을 설치하려고 공식 문서의 명령어 를 아래 처럼 해봐도 해당 버전이 설치되지 않고 무조건 최신 버전만 설치가 되더군요. npx react-native init AwesomeTSProject --version x.xx.x --template react-native-template-typescript 리서치 해보니 --version=x.xx.x 또는 --version="x.xx.x" 등도 있었지만 모두 제대로 작동하지 않았습니다. 해결은 타입스크립트 템플릿의 버전을 지정 해 줘야하네요. react-native-template-typescript의 릴리즈 버전 에 종속적인 리액트 버전을 확인해서 아래와 같이 설치하면 됩니다. npx react-native init rntype --template react-native-template-typescript@6.5.13 왼쪽은 최신버전이고 오른쪽이 타입스크립트 템플릿 6.5.13으로 설치한 것입니다. 아마 타입스크립트 리액트가 아니고 자바스크립트 버전이었다면 그냥 될 수도 있겠네요.

Mac Mission Control 데스크탑 위치 고정하기

이미지
 윈도우에서는 가상 데스크톱 화면을 어짜피 듀얼 모니터라 사용하지 않지만, 맥북에서는 모니터가 하나이기 때문에 미션 컨트롤을 활용해서 여러 데스크톱 화면을 사용중에 있습니다. 다 좋은데 가끔 카톡메세지를 연다던지 하면 데스크톱 화면의 위치 순서가 바뀌는 이슈가 있네요. 순서를 본인이 설정한데로 고정하도록 해보겠습니다. 시스템 환경설정 - Mission Control을 실행해줍니다. Spaces를 최근 사용 내역에 따라 자동으로 재정렬이 체크가 되어 있는데 체크 해제하시면 이제 자동 재정렬 되지 않게 됩니다.

Github remote: Repository not found.

이미지
 깃허브에서 원격에 무언가 작업을 하려고 하면 에러가 발생했습니다. remote: Repository not found. fatal: repository 'https://github.com/저장소.git/' not found 저의 경우 원인은 기존에 사용하던 깃허브를 사용하다가 추가로 깃허브 계정을 생성해서 사용하려는데 기존에 자격 증명이 되어 있던 계정으로 처리가 되면서 꼬인 이슈였습니다. 일단 윈도우 환경이었는데 제어판 - 사용자 계정 - 자격 증명 관리자 - Windows 자격 증명에서 깃허브 관련을 모두 제거 후 다시 사용할 계정으로 시도 하면 잘 됩니다.

Visual Studio Code Prettier가 작동하지 않는 이슈

이미지
 윈도우 환경에 리액트 + 타입스크립트 환경을 세팅중에 있었습니다. 코드 정적 분석 도구인 ESLint와 코드 포멧터인 Prettier을 설치 및 관련 json이나 .prettierrc 파일도 설정했지만 파일 저장시에 작동을 안하더군요. 일단 2가지를 확인 해봐야 합니다. 먼저 Ctrl + , 를 눌러 세팅 창을 열고 default formatter을 입력해 기본 포멧터가 None null로 되어 있다면 Prettier - Code formatter esbenp.prettier-vscode로 선택해줍니다. 다음으로 editor format on save를 검색해서 나오는 것이 체크 해제되어 있다면 체크 해줍니다.

Windows PowerShell 스크립트 실행 에러 PSSecurityException UnauthorizedAccess

이미지
 윈도우 환경의 파워쉘에서 NestJS cli를 실행하려는데 에러가 발생하네요. nest : 이 시스템에서 스크립트를 실행할 수 없으므로 C:\Program Files\nodejs\nest.ps1 파일을 로드할 수 없습니다. 자세한 내용은 about_Execution_Policies(https://go.microsoft.com/fwlink/?LinkID=135170)를 참조하십시오. 위치 줄:1 문자:1 + nest + ~~~~     + CategoryInfo          : 보안 오류: (:) [], PSSecurityException     + FullyQualifiedErrorId : UnauthorizedAccess 해당 에러는 NestJS가 아니더라도 NodeJS에서나 기타 다른 파워쉘 스크립트 실행시에도 발생할 수 있습니다. 악성 스크립트의 실행을 방지하는 정책으로 기본 세팅으로 되어 있기 때문에 나는 발생하는 에러 로 보입니다. 파워쉘에서 ExecutionPolicy 명령어로 현재 정책을 확인해봅니다. PS C:\Users\wwfor> ExecutionPolicy Restricted Restricted Windows 클라이언트 컴퓨터에 대한 기본 실행 정책입니다. 개별 명령을 허용하지만 스크립트는 허용하지 않습니다. 서식 및 구성 파일(), 모듈 스크립트 파일() 및 PowerShell 프로필( .ps1xml``.psm1 )을 비롯한 모든 스크립트 파일의 실행을 방지합니다 .ps1 . 실행을 허용하기 위해 실행 정책을 변경해줘야합니다. 파워셀을 관리자 권한으로 실행해서 Set-ExecutionPolicy로 정책 변경 을 아래와 같이 해줍니다. PS C:\Users\wwfor> Set-ExecutionPolicy RemoteSigned Remotesigned Windows 서버 컴퓨터에 대한 기본 실행 정책입니다. 스크립트를 실행할 수 있습니다. 전자 메일 및 인스턴트 메시징 프로그램을 포함하는 인터넷에서 다운로드한 스크립트 및 구성

nvm-windows 사용시 exit status 1 에러

 윈도우 10에 node.js 설치 할려고 nvm-windows 에서 최신버전인 1.1.9를 설치했습니다. 현재기준 node v16.14.2 를 nvm install v16.14.2 로 설치해주고 사용하기 위해 nvm use 16.14.2 해주니 에러가 발생하네요. exit status 1: �׼����� �źεǾ����ϴ�. exit status 1 이외에도 exit 5, exit 145 등의 에러가 나면 공식 깃헙 에서 확인해 보면 될 듯합니다. nvm-windows가 1.1.8부터는 개발자 모드에 관한 처리를 한 것 같습니다. 저의 경우 해결은 Windows Terminal(파워쉘)을 관리자 권한으로 실행 후 nvm use 16.14.2 해주니 잘 되네요. Now using node v16.14.2 (64-bit)

Github Tag 추가, 삭제, 푸쉬하기

 기존에 Git Fork Client를 사용할 때는 Tag도 리모트에 추가를 해줬는데 지금은 비주얼 스튜디오 코드와 깃허브 데스크탑만 사용중인데 태그 생성은 로컬에만 되고 원격에 푸쉬가 안되네요. 태그 관련 깃 명령어를 정리해봅니다. 로컬에 태그를 생성 git tag tag-name 로컬 태그 목록 조회 git tag 로컬 태그 삭제 git tag -d tag-name 원격 태그 조회 git ls-remote --tags 원격에 태그 푸쉬 git push origin tag-name 원격 태그 삭제 git push origin -d tag-name

DearPyGui 윈도우에서 ImportError: DLL load failed while importing _dearpygui: 지정된 모듈을 찾을 수 없습니다.

이미지
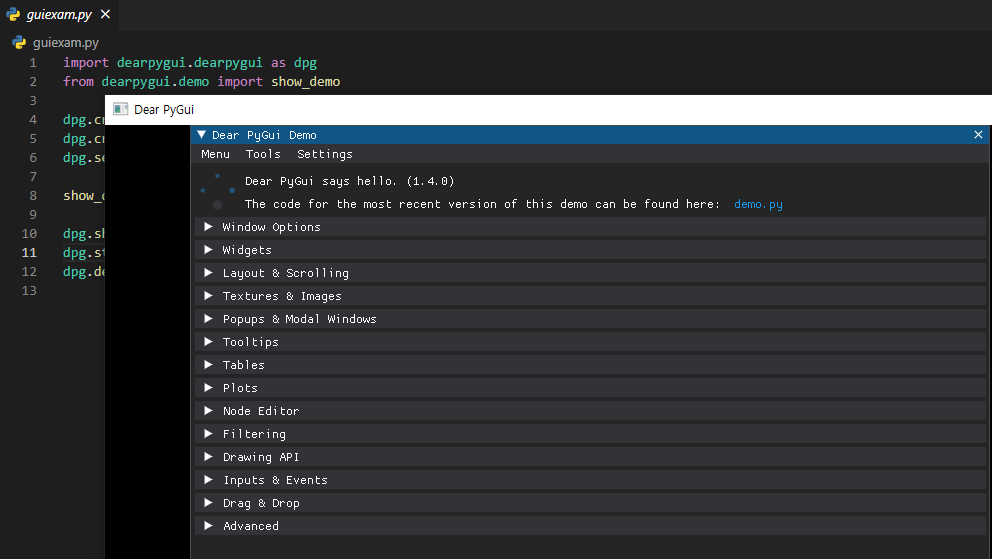
 DearPyGui를 윈도우에서 실행시 아래와 같은 에러가 발생했네요. Traceback (most recent call last):   File "d:/Project/luts/guiexam.py", line 1, in <module>     import dearpygui.dearpygui as dpg   File "C:\Users\wwfor\AppData\Local\Programs\Python\Python38\lib\site-packages\dearpygui\dearpygui.py", line 22, in <module>     import dearpygui._dearpygui as internal_dpg ImportError: DLL load failed while importing _dearpygui: 지정된 모듈을 찾을 수 없습니다. 오래된 DearPyGui는 dll 의존성이 없었는데 현재 1.4.0 버전 기준으로는(물론 훨씬 더 이전버전에서부터) 윈도우에서는 dll파일에 의존성 이 있네요. 마이크로소프트 사이트에서 최신버전 Visual C++ Redistributable 파일 을 받아 설치하면 해결됩니다.

크롬 북마크 좀비처럼 되살아나는 증상 해결하기

이미지
 언제부턴가 크롬을 다시 설치하게 되면 분명 삭제했던 북마크나 북마크 폴더가 좀비처럼 자꾸 되살아나는 증상이 있었습니다. 아래 스샷은 지웠던 폴더인데 폴더에 북마크도 없고 지운 폴더도 크롬만 다시 설치하면 되살아나더군요. 역시나 구글링하니 해결책이 있네요. 먼저 크롬 북마크를 다시 좀비처럼 살아난 부분을 정리하고 북마크를 백업합니다. Ctrl + Shift + O키를 누르거나 아래와 같이 크롬의 프로필 옆의 점 3개 버튼을 눌러 북마크 -> 북마크 관리자를 실행합니다.  북마크 관리자에서 역시나 점 3개 버튼을 눌러 북마크 내보내기로 적당한 위치에 백업을 합니다. 다음으로 구글 계정의 크롬 데이터 사이트 로 이동해서 제일 밑에 데이터 지우기를 선택해서 지워줍니다. 이제 조금전에 백업했던 북마크들을 북마크 관리자에서 가져오기를 통해 가져옵니다. 마지막으로 크롬 설정 - 동기화 및 Google 서비스 - 동기화 관리에서 모두 동기화를 해주시면 됩니다. 제가 다른 PC에서도 크롬을 사용중인데 다른 PC의 크롬도 동기화가 잘 되네요. 일단 저는 다른 PC 크롬에서 먼저 크롬 사용자 프로필을 삭제하고 위 과정을 진행 후 다시 추가를 한 것이니 다른 분들도 일단 크롬을 여러개 사용중이시라면 다른 PC의 크롬 사용자 프로필을 먼저 삭제하시고 진행해보시길 바랍니다.

PlantUML로 Visual Studio Code에서 UML Diagram을 만들어보자.

이미지
 UML은 예전에 StarUML 무료 프로그램과 그 이전에 뭐였는지 기억이 안나지만 그런 도구들로 잠깐 깔짝거리고는 UML로 설계를 하거나 뭔가 분석한 것에 대한 다이어그램을 그리던가 하지는 않았습니다. 이번에 기존에 만들어진 프로젝트 분석하는데 UML을 적용 해볼까 합니다. 그런데 기존 GUI 도구들과는 다르게 자체 스크립트 기반이라 코딩하듯이 UML을 만들 수 있는 것이 PlantUML 이라고 하네요. 텍스트 기반이라 개발하듯이 Git등 형상관리 툴로 협업과 유지보수도 가능하겠네요. 간단히 Helloworld 느낌으로 공식 홈페이지에 있는 아래 예제를 보면, 간단한 문법으로 다이어그램이 표현이 되는 것을 확인할 수 있습니다. 일단 공식 홈페이지의 온라인 서버에서도 에디팅 을 지원하고 수정하면 바로 적용이 되네요. 메모장 같은 것을 사용해도 되겠지만, 개발하면서 바로 UML작업을 할 수 있게 비주얼 스튜디오 코드에서 PlantUML 사용하는 것을 정리해 봅니다. 맥에서 진행하는 것을 정리합니다. 먼저 PlantUML을 사용하기 위해 필수 요구사항인 자바를 설치합니다. 저는 OpenJDK로 설치 했습니다. brew tap adoptopenjdk/openjdk brew install --cask adoptopenjdk11 다음, 옵션으로 시퀸스 다이어그램과 액티비티 다이어그램 이외의 다이어그램들을 그리기 위해서는 Graphviz도 설치해줘야 합니다. brew install graphviz 마지막으로 비주얼 스튜디오 코드 확장을 설치합니다. plantuml로 검색하면 제일 다운로드수가 많은 녀석인 아래 스샷에 보이는 것으로 하면 될 듯 하네요. 자동 업데이트 기능도 있고 괜찮은거 같습니다. wsd 또는 puml 이라는 확장자를 가지는 테스트 파일을 만들어 간단히 입력 후 command + shift + p 키를 눌러 plant로 검색 후 나오는 Preview Current Diagram을 선택합니다. 그러면 잠시후 아래와 같이 프리뷰 화면이 나옵니다. option

MacOS OpenJDK 설치하기

이미지
 맥에 자바를 설치할 일이 있어 brew install java11 로 설치했는데도 아래와 같이 뜨면서 실행이 안되더군요. java -version The operation couldn’t be completed. Unable to locate a Java Runtime. Please visit http://www.java.com for information on installing Java. 이렇게 된거 오라클의 자바말고 오픈JDK설치를 한번 해볼까 합니다. 일단 설치된 오라클 자바를 지워줍니다. brew uninstall java11 sudo rm -fr "/Library/Internet Plug-Ins/JavaAppletPlugin.plugin" sudo rm -fr "/Library/PreferencesPanes/JavaControlPanel.prefPane" sudo rm -fr "~/Library/Application Support/Oracle/Java" 오픈JDK 설치하기 전에 brew에 openjdk 저장소를 추가합니다. brew tap adoptopenjdk/openjdk 이제 오픈jdk를 설치합니다. brew install --cask adoptopenjdk11 cask 를 처음 접해서 저도 잠시 찾아보니 맥용 어플리케이션을 기존에 dmg로 받아 설치하던 것을 cli로 지원해주는 것 같습니다. 이제 설치 확인을 위해 자바 버전을 확인해봅니다. java -version openjdk version "11.0.11" 2021-04-20 OpenJDK Runtime Environment AdoptOpenJDK-11.0.11+9 (build 11.0.11+9) OpenJDK 64-Bit Server VM AdoptOpenJDK-11.0.11+9 (build 11.0.11+9, mixed mode)

DearPyGUI Alias already exists 에러

 파이썬의 GUI모듈인 DearPyGUI에서 아래와 같은 에러가 발생했습니다. Exception:  Error:     [1000] Command:   add alias Item:      0  Label:     Not found Item Type: Unknown Message:   Alias already exists 아래와 같이 dpg(dearpygui)는 tag 속성으로 ui들에 별칭을 줘서 구분할 수 있는데 tag가 같은게 있어서 발생한 에러였네요. tag를 유니크하게 수정해주면 됩니다. dpg . add_button ( label = 'Press me ' , tag = 'mybutton' )

Python TypeError: if no direction is specified, key_or_list must be an instance of list

 파이썬 파이몽고의 sort 메소드를 사용 중 아래와 같은 에러가 발생했습니다. TypeError: if no direction is specified, key_or_list must be an instance of list Candle . find ( market_code , 'Day1' ).sort({ 'time' , 1 }).limit( 1 )) 위와 같이 호출했을 때 sort안에 인자로 {} 객체형이 아닌 sort('time', 1) 같은 key, direction값으로해야합니다. 여러개로 할 것이라면 [('time', 1)] 과 같은 리스트 형식으로 해주면 됩니다.

Python 숫자 3자리마다 콤마(,) 넣기

이미지
 파이썬에서 숫자를 화폐 단위 3자리마다 콤마를 찍어보려고 합니다.  2가지 방식이 있는 것 같습니다. 먼저 format(숫자, ',')) 해주면 3자리로 된 문자열로 리턴 해주네요. 또는 f-string으로 해주는 {숫자:,} 방식이 더 깔끔하게 보이네요. balance = 10000000 print ( f '밸런스 { balance } ' ) print ( f '밸런스 { format ( balance , "," ) } ' ) print ( f '밸런스 { balance :,} ' )

Github Profile Readme로 꾸미기

이미지
 깃허브를 기웃거리다가 제 허접한 프로필과는 다른 프로필을 보았습니다. 아래와 같이 각종 통계 카드(Stats Card)와 Most Used languages를 보여주는게 멋지더군요. 그래서 깃허브에 적용하는 것을 한번 정리해 봅니다. 먼저 자신의 username과 같은 저장소를 하나 만들어 줍니다. 만들려고 할 때 special repository라는 마치 이스터에그를 찾은 것 같은 문구가 나오네요. 당연히 Public로 만들어야하고 README 파일 부분을 체크하고 만들어야 합니다.  다음으로  Github Stats Card 를 추가하려면 readme 파일에 아래 내용을 추가합니다. 여기서 username 부분에 자신의 깃허브 username을 입력해주면 됩니다. [![Anurag's GitHub stats](https://github-readme-stats.vercel.app/api?username= anuraghazra )](https://github.com/anuraghazra/github-readme-stats) 그리고 Most Used Languages를 추가하려면 역시나 username을 자신의 것으로 변경 후 아래 내용을 추가해줍니다. [![Top Langs](https://github-readme-stats.vercel.app/api/top-langs/?username= anuraghazra )](https://github.com/anuraghazra/github-readme-stats) 기타 아이콘을 추가하거나 테마를 바꾸는 등 다른 옵션을 추가할 수 있습니다. 자세한 것은 github-readme-stats 를 참고하세요. 썰렁하던 제 깃허브 프로필 화면이 바뀌었습니다. public 이외의 저장소 내용은 당연히 적용이 안되기 때문에 뭔가 내용이 허접하네요 ㅎ. public 활동을 많이 하도록 더욱 분발 해야겠습니다.

MacOS 터미널 호스트 이름 변경하기

이미지
 맥os를 처음 설치 후 터미널을 실행해보면 자동으로 전체이름에 따라서 호스트 이름이 설정되는 것 같습니다. 아래 스샷에는 adminui로 되어 있지만 원래는 한글 이름을 콩글리쉬로 된 영어로 설정이 되어 있더군요. 개발 이슈등을 공유할 때 가끔 찍히는 터미널 스샷에 이름이 공개되어 있으면 좀 그러니 다른것으로 변경해봅니다. 터미널에서 아래와 같이 입력해 줍니다. new_name에 원하시는 이름을 입력하시면 됩니다. 그러면 팝업이 하나 뜨는데 거기서 맥의 암호를 입력후 구성 수정을 눌러 수정하시면 됩니다. scutil --set HostName new_name 터미널을 다시 시작하거나 hostname으로 확인해보면 호스트 이름이 바뀐것을  확인할 수 있습니다.

Node.js ts -> js 자동 변환 ts-node 활용 TypeScript 기본 환경 세팅하기

이미지
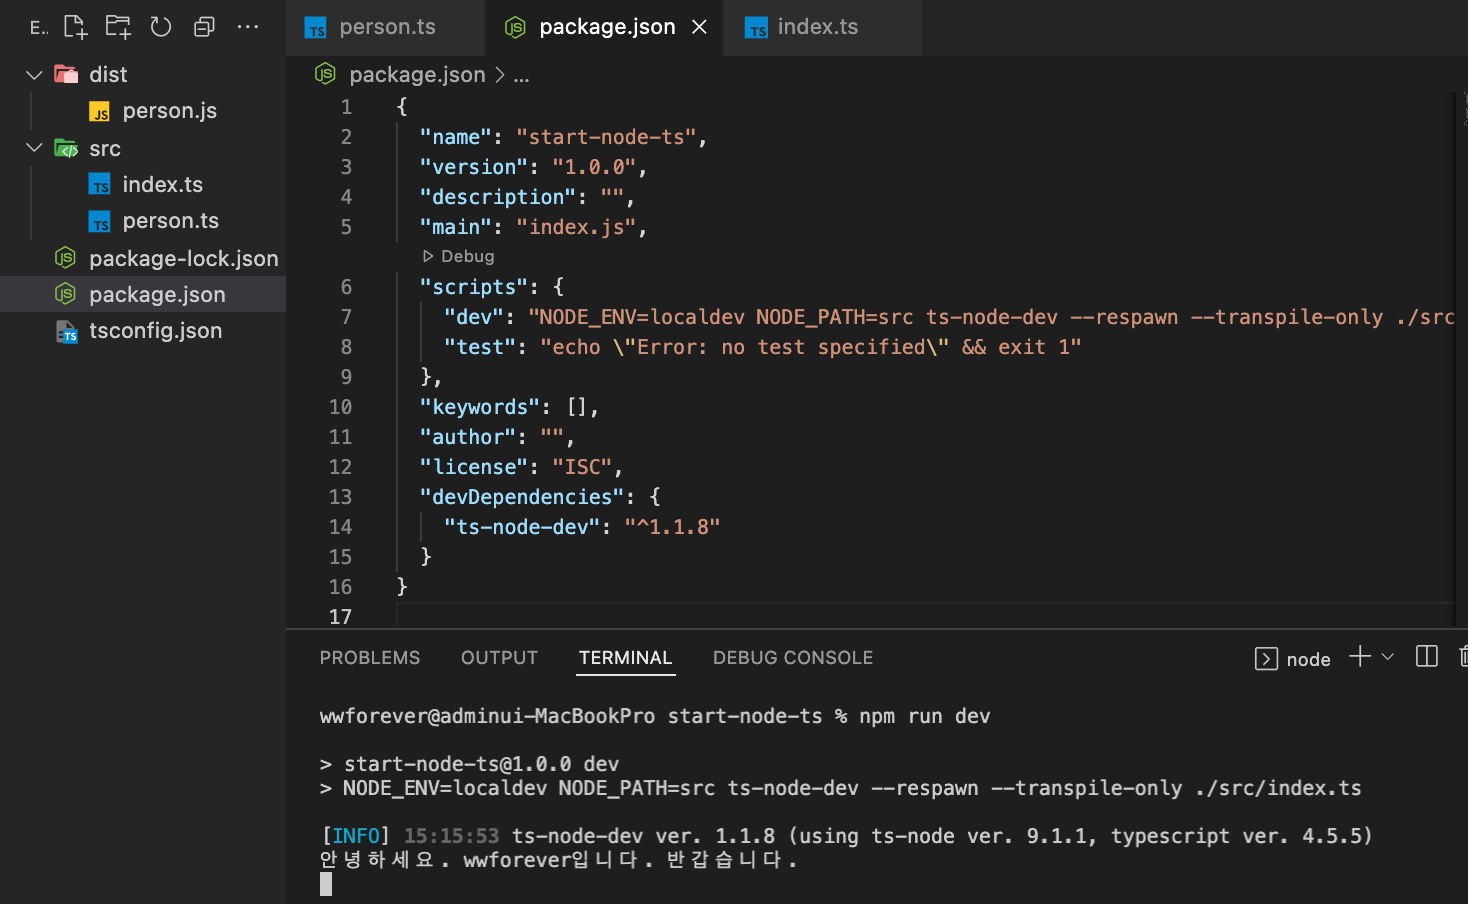
 기존에 Node.js에 타입스크립트와 @types/node를 세팅해서 기본 환경을 구축 해봤습니다. 하지만 이렇게 했더니 node.js에서는 ts를 바로 실행을 못해서 tsc 컴파일을 계속 해줘야 하는 이슈가 있더군요. package.json의 script 부분에 수정을 해주면 node 실행시마다 자동으로 tsc 컴파일 해줄 수 있을 듯 하지만 이번에는 ts-node 라는 녀석을 활용하는 것을 정리해봅니다. ts-node는 JIT을 통해서 precomile 없이 node.js에서 ts를 바로 실행할 수 있게 해주는 모듈 이네요. ts-node대신 개발용에 특화된 것 처럼 보이는 ts-node-dev 를 설치해서 사용하겠습니다. npm i -D ts-node-dev 입력해 개발 종속성으로 설치해줍니다. src/index.ts를 아래와 같이 간단히 만들어줍니다. Person은 기존에 만들었던 것 에서 객체 생성과 console.log부분만 지워줍니다. import { Person } from "./person" ; const person : Person = new Person ( "wwforever" ); console . log ( person . sayHello ()); ts-node-dev src/index.ts로 실행하면 아래와 같이 에러가 발생합니다. sh: command not found: ts-node-dev 아래와 같이 package.json의 script에 추가해서 npm run dev로 실행시켜줍니다. respawn과 transpile-only는 각각 node-dev와 ts-node의 옵션이라고 합니다. 2개 모듈의 기능을 합친게 ts-node-dev이니 둘다 기본 옵션으로 추가해줍니다. "scripts" : { "dev" : "NODE_ENV=localdev NODE_PATH=src ts-node-dev --respawn --transpile-o

Node.js TypeScript 기본 환경 세팅하기

이미지
 Node.js 프로젝트에 타입스크립트 기본 환경 설정하는 것을 정리합니다. 일단 node.js가 설치 되어있다고 가정합니다. 먼저 프로젝트 폴더를 만들고 터미널에 npm init -y을 입력해줍니다. 저는 start-node-ts라는 폴더에 만들어줬습니다. 다음으로 npm i typescript 를 입력해 타입스크립트를 설치합니다. 다음으로 node의 각종 기본모듈의 d.ts 추가를 위해 npm i -D @types/node 를 설치합니다. 보통 @types 하위 패키지들은 개발용으로만 필요하기 때문에 -D(대문자) 또는 --save-dev 옵션으로 설치해줍니다. 그러면 package.json의 devDependencies에 @types.node가 추가되고 node_modules/@types 가 추가됩니다. tsc --init를 실행해서 tsconfig.json 파일 을 생성합니다. compilerOptions 기본 설정에 outDir이 주석으로 되어 있는데 "./dist"로 변경해서 js로 컴파일된 파일이 저장될 폴더를 지정합니다. 2022년 2월기준 es2016으로 target이 설정되네요. 이제 간단한 타입스크립트 샘플 파일을 아래와 같이 만들고 터미널에서 tsc를 입력해 ts 파일을 js로 컴파일 합니다. node dist/person.js 를 실행하면 결과가 잘 나옵니다. 여기까지 했다면 프로젝트 진행에 불현한 것이 계속해서 수동으로 ts를 js로 컴파일 해줘야하는 것입니다. ts-node를 통해 ts 파일을 node에서 바로 실행하는 것을 추가로 정리 해봤습니다.